Roof Sheathing Nailing Pattern
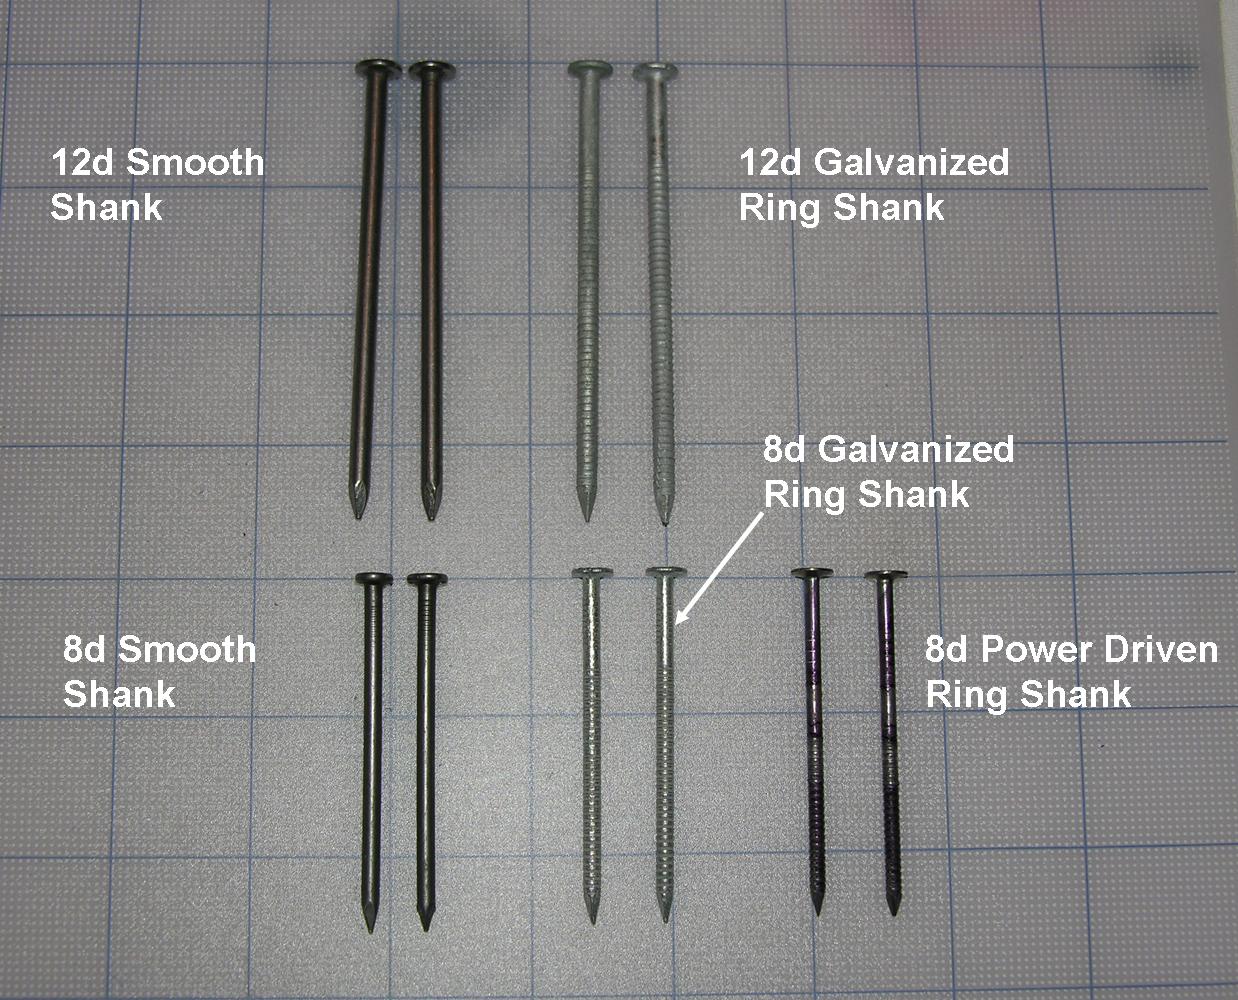
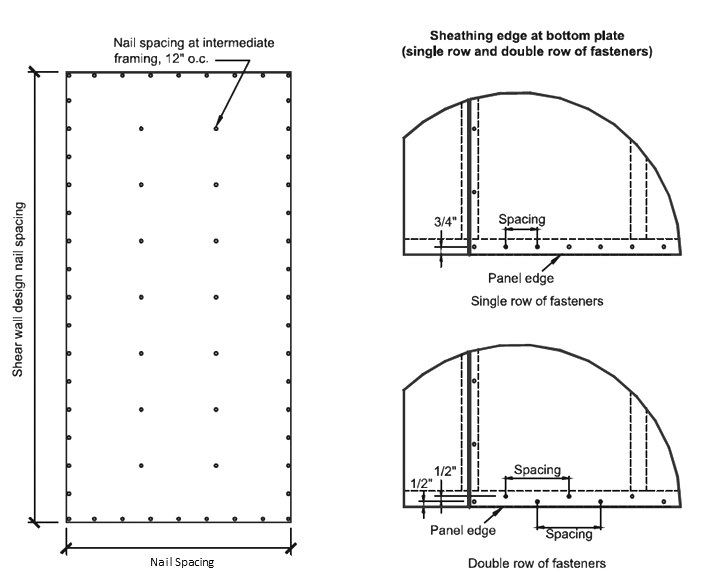
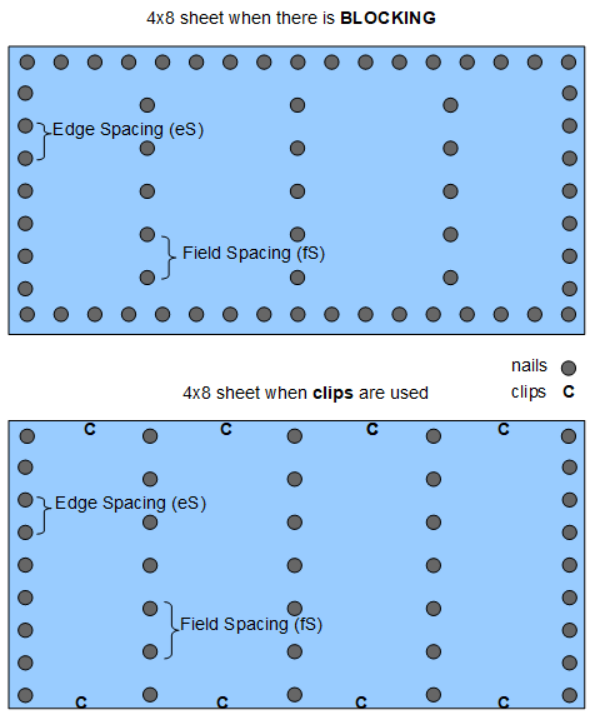
Roof Sheathing Nailing Pattern - This can be done with a straight piece of lumber (6 feet to 10 feet long) or a long carpenter's level. The preferred vantage point for the first goal (confirming nail spacing) is from above the deck since the nail heads are visible and the distance between them can be measured. Provide roof ventilation according to building codes (see hints below and figure 2). Web install it with 6 inches of clearance at the bottom. Cover roof sheathing with shingle underlayment felt. Properly fasten panels (including fastening and spacing hints) step 4: Always check for level nailing surface. Install it by driving nails into place near the top edge, and make sure the board is at a slight angle. Confirm nail penetration into roof structural members. Install shingles according to manufacturer recommendations. Install it by driving nails into place near the top edge, and make sure the board is at a slight angle. Omit roof sheathing panels in each course of sheathing between sections and install “fill in” panels. Web tips that will make sheathing a roof with plywood easier. Tab shingles need two nails on each side of the tab Web roof sheathing may not seem like a difficult job, but there is a lot to know about keeping sheets of plywood or osb on a consistent layout, with the right workflow, and proper nailing pattern. Web following these simple construction steps for roof sheathing will provide best performance and minimize complaint callbacks. Web nailing of wall sheathing shall be increased to 8d ring shank or 10d nails on 4 inches on center along the edges and 6 inches on center in the field. Web when you replace a roof on a home that was built before the implementation of the statewide florida building code on march 1, 2002, the nailing of the roof sheathing (decking) must be brought up to current standards for hurricane resistance as part of the installation of the new roof. Use the correct roofing nail material, size, and grade as specified in the shingle installation instructions. To ensure optimal performance of your asphalt roofing shingles, be sure to follow these general directions for proper nailing: Web the number of nails needed for a roof varies on multiple factors, such as board face width, length and roof truss spacing. Learn about panel layout, nailing off, and roof staging. Use the correct roofing nail material, size, and grade as specified in the shingle installation instructions. Web install it with 6 inches of clearance at the bottom. Web. Install it by driving nails into place near the top edge, and make sure the board is at a slight angle. To ensure optimal performance of your asphalt roofing shingles, be sure to follow these general directions for proper nailing: Web what is the nailing pattern for roof sheathing? The choice between staggered and edge fastening should align with the. This guide will focus on the products and techniques relevant to new construction. Always check for a level. Properly fasten panels (including fastening and spacing hints) step 4: Web following these simple construction steps for roof sheathing will provide best performance and minimize complaint callbacks. Cover roof sheathing with shingle underlayment felt. Web the nails needed for roof sheathing calculator computes the approximate number of nails needed to nail 4x8 sheets to trusses or rafters on a roof based on the dimensions of the roof, spacing of nails on the edges and field of the 4x8, and whether blocking or clips are use. This strip should be 1.25 inches wide. Web general. Choose units and enter the following: Install it by driving nails into place near the top edge, and make sure the board is at a slight angle. These schedules were calculated to provide resistance to wind uplift pressure as required by most codes. Check the nailing surface is level. Properly fasten panels (including fastening and spacing hints) step 4: Web secure roof sheathing to rafters or trusses using dense screw patterns, clips, and straps to increase the uplift resistance. Always check for level nailing surface. Web following these simple construction steps for roof sheathing will provide best performance and minimize complaint callbacks. These schedules were calculated to provide resistance to wind uplift pressure as required by most codes. Web. Choose units and enter the following: Place the nails closer together and use more of them to create a stronger roof. The choice between staggered and edge fastening should align with the specific requirements of the project, local building codes, and load considerations. To ensure optimal performance of your asphalt roofing shingles, be sure to follow these general directions for. Choose units and enter the following: Learn about panel layout, nailing off, and roof staging. Always check for a level. Web the number of nails needed for a roof varies on multiple factors, such as board face width, length and roof truss spacing. Web following these simple construction steps for roof sheathing will provide best performance and minimize complaint callbacks. Cover roof sheathing with shingle underlayment felt. Web roof sheathing may not seem like a difficult job, but there is a lot to know about keeping sheets of plywood or osb on a consistent layout, with the right workflow, and proper nailing pattern. Web general guidelines for nailing shingles. Always check for level nailing surface. Tab shingles need two nails. Choose units and enter the following: (l) (s) (oh) (p) (es) Place the nails closer together and use more of them to create a stronger roof. Web general guidelines for nailing shingles. Web there are two primary goals of roof deck nailing documentation: The preferred vantage point for the first goal (confirming nail spacing) is from above the deck since the nail heads are visible and the distance between them can be measured. This strip should be 1.25 inches wide. Always check for a level. Web following these simple construction steps for roof sheathing will provide best performance and minimize complaint callbacks. Provide roof ventilation according to building codes (see hints below and figure 2). Place the nails closer together and use more of them to create a stronger roof. Tab shingles need two nails on each side of the tab Web the nails needed for roof sheathing calculator computes the approximate number of nails needed to nail 4x8 sheets to trusses or rafters on a roof based on the dimensions of the roof, spacing of nails on the edges and field of the 4x8, and whether blocking or clips are use. Web install it with 6 inches of clearance at the bottom. Web following these simple construction steps for roof sheathing will provide best performance and minimize complaint callbacks. Use the correct roofing nail material, size, and grade as specified in the shingle installation instructions. Web general guidelines for nailing shingles. Check the nailing surface is level. Install it by driving nails into place near the top edge, and make sure the board is at a slight angle. Web tips that will make sheathing a roof with plywood easier. Web what is the nailing pattern for roof sheathing?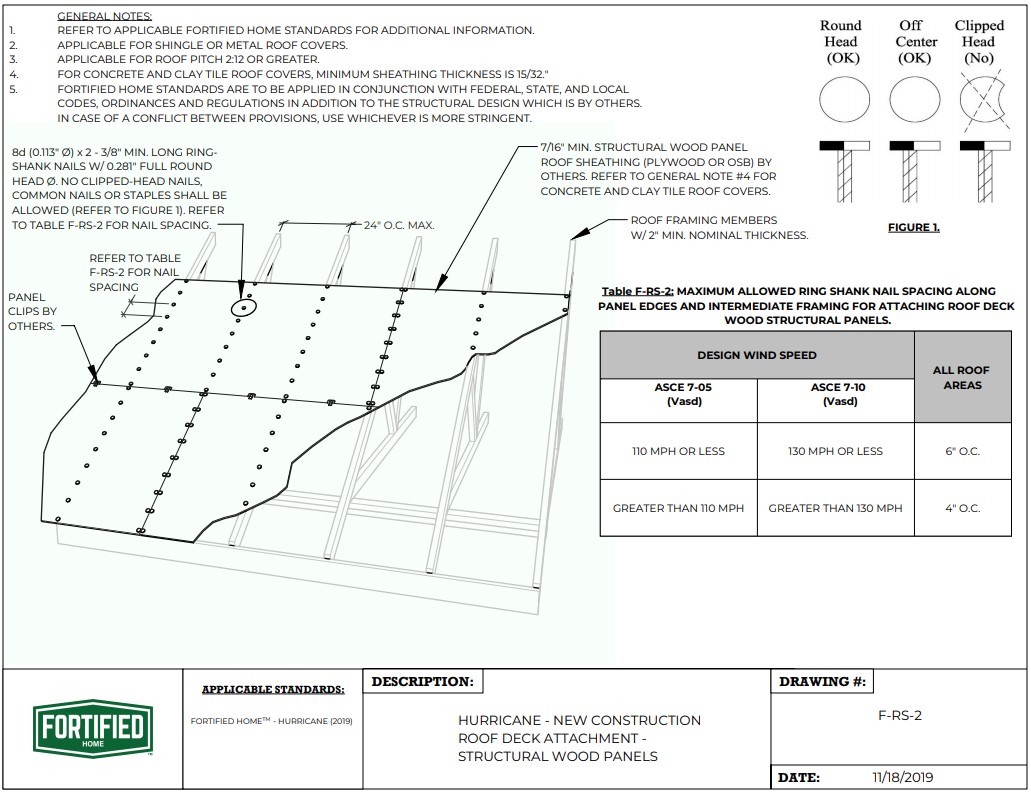
Roof Sheathing Nail Pattern My Bios

Roof Sheathing Nail Pattern Nail Ftempo
Roof Sheathing Nail Pattern Nail Ftempo

Sheathing a Roof Fine Homebuilding
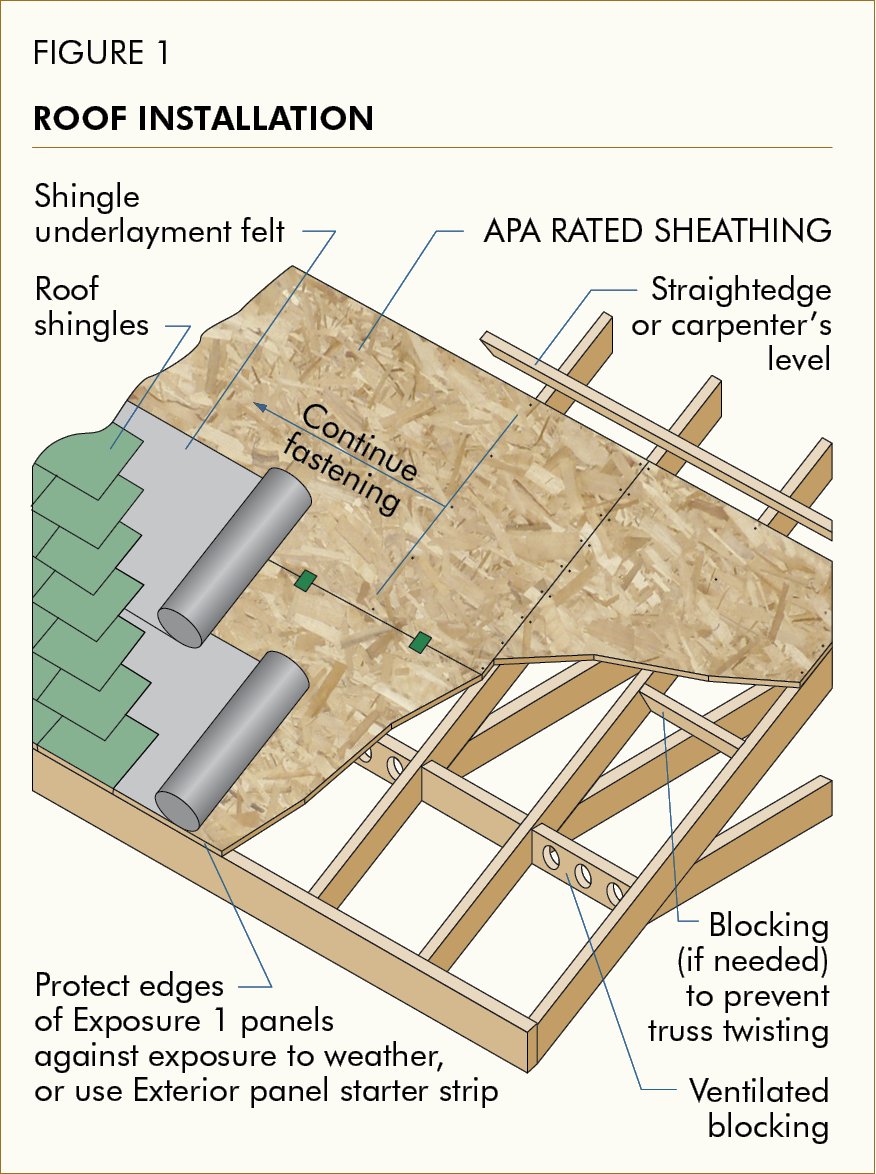
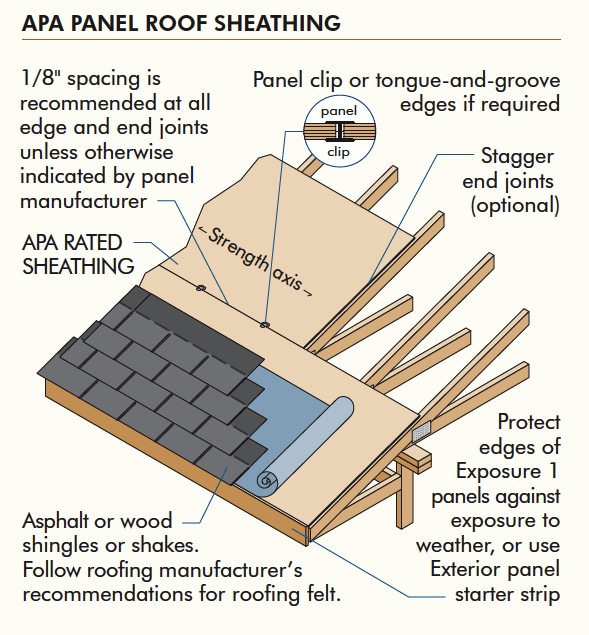
APA Builder Tips Proper Installation of APA Rated Sheathing for Roof
Roof Sheathing Pattern
Roof Sheathing Nail Pattern Nail Ftempo
Roof Sheathing Nail Pattern Nail Ftempo
Nails for Gable Roof Sheathing

Roof Sheathing Nail Pattern Nail Ftempo
Omit Roof Sheathing Panels In Each Course Of Sheathing Between Sections And Install “Fill In” Panels.
Install Shingles According To Manufacturer Recommendations.
Cover Roof Sheathing With Shingle Underlayment Felt.
The Choice Between Staggered And Edge Fastening Should Align With The Specific Requirements Of The Project, Local Building Codes, And Load Considerations.
Related Post: